Are you using several different computers at home? Then you will certainly benefit from learning how to setup a home network on Windows 10. You can easily perform the individual steps yourself. Just follow the instructions below, and you will be able to use the network sharing functions and share single documents or even whole devices with your family. This includes for example all modern printers, whose most different installation problems you can therefore prevent.
How to Setup a Home Network on Windows 10?
To be able to setup a home network on Windows 10, you unfortunately have to get a bit creative by now. The ever-popular home network group no longer exists since Windows 10 version 1803. As an alternative, you can create a so-called Windows 10 Workgroup. Don’t let the name fool you, because this feature is also intended for private use.

As a rule, you have to make a few changes on your operating system. The network can be set up, shared and devices connected by following these steps:
Windows 10 Workgroup: How can I Establish a Network Connection?
- Enable File and Printer Sharing for Microsoft Networks
- Change the Network Type: Customize your Windows 10 Workgroup
- Log into Windows with the Correct Microsoft Account
- How to Setup a Home Network on Windows 10 through Discovery
So let’s start with the first item on the list. You’ll need to make all of these changes once on each PC that will be connected to the Windows workgroup.
1. Enable File and Printer Sharing for Microsoft Networks
There are several ways to get to the network and Internet settings of Windows 10. If you are connected to the Internet via WiFi, a right-click on the corresponding icon will quickly take you there. Otherwise, follow the steps below on how to setup a home network on Windows 10:
- Go to the Windows Settings. To do this, either click on the gear icon in the Start menu or press the Windows logo key + I at the same time.
- Choose Network and Internet.
- Under the Advanced Network Settings, you will find the button Change Adapter Options. Open it with a mouse click.
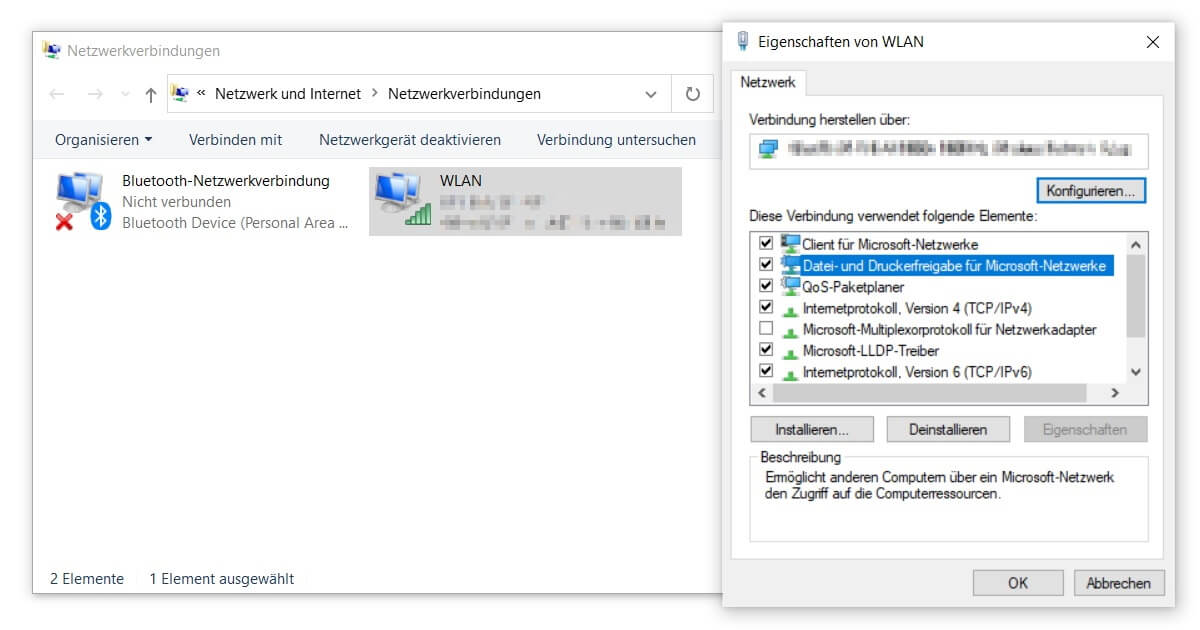
- A new window with the current network connections of your device appears. Double-click to select the active connection (usually the WiFi without the red cross).
- In the smaller window, click on Properties. The crest indicates that you may need your admin password (see administrator account).
- You should already be in the Network tab. Under the properties of this connection, you will see the item File and Printer Sharing for Windows 10 Workgroup. Make sure that there is a check mark in front of it.
- Confirm all changes with OK and exit the settings.
2. Change the Network Type: Customize your Windows 10 Workgroup
Now we’ll come to the most important step. You need to make changes in Windows 10’s Advanced System Settings to finally be able to setup your home network on Windows 10. If you have difficulties with this, try to fix your taskbar first.
- Open the Windows Control Panel. The quickest way to get there is to use the search function with Windows logo key + S. Just type in the name Control Panel.
- Then click on System and Security and there again on System.
- A bit further down, you will find the Advanced System Settings.
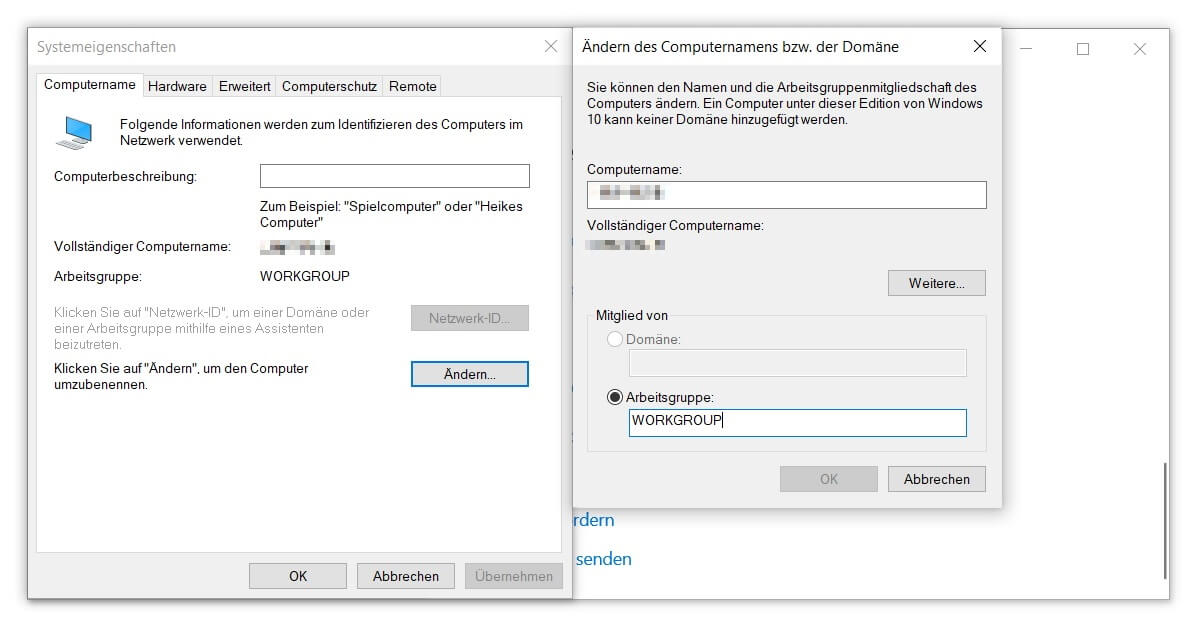
- Switch to the Computer Name tab and click on the Change button.
- Here you can change the network name. Before you can set up the network, this is WORKGROUP by default. If you also want to change the display name of your PC, you can do that here as well.
- Confirm with OK and check in the future that all devices are running on the same network.
3. Log into Windows with the Correct Microsoft Account
To access the settings of the logged-in user, the best way to get there is to open the Windows 10 Start menu, which is the Windows icon on the far left of your taskbar. There you will see the name of your account and possibly a profile picture. Click on it to change the account settings. In order to use the network or the Windows 10 workgroup you created, each PC must be logged in with a matching Microsoft account.
You can tell if you already have such an account by the blue text under your name: Manage my Microsoft account. If you are still connected via a local user, you will see Log in with a Microsoft account instead. On the official Microsoft site, you can create an account for free and use it in the future. Now there is only one step left to finish if you know how to setup a home network on Windows 10.

4. How to Setup a Home Network on Windows 10 through Discovery
One last thing to note before you finish setting up your Windows 10 workgroup:
- Again you go to the settings (Windows logo key + I) and click there again on Network and Internet.
- This time, however, you open the Network and Sharing Center.
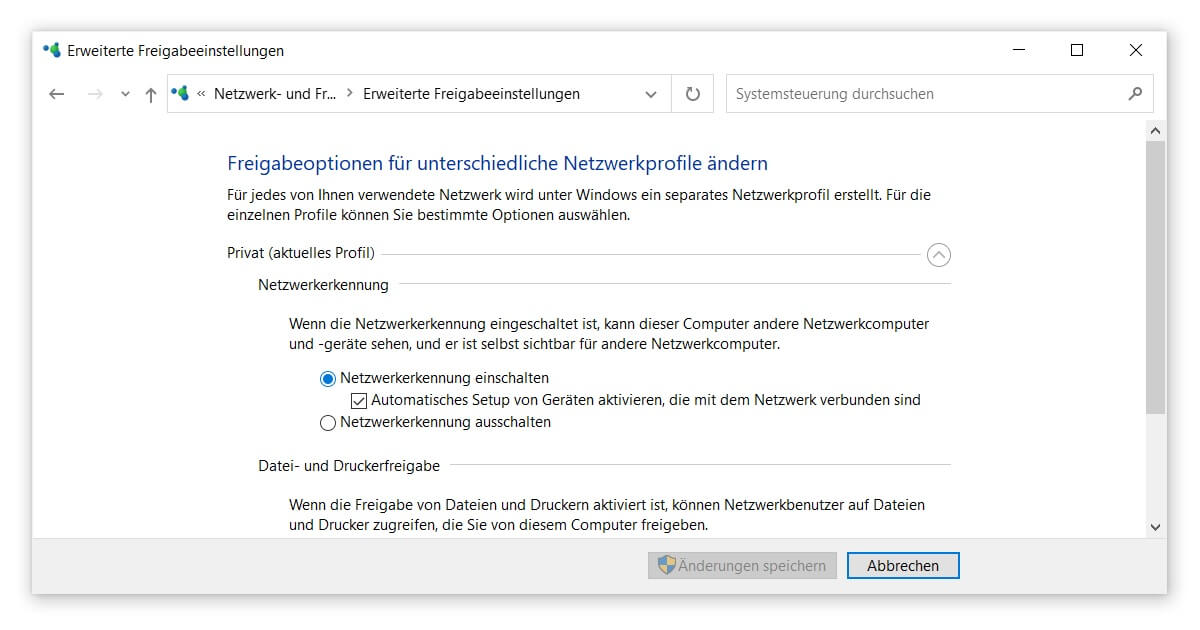
- There you will find the option Change advanced sharing settings on the left side.
- Right under the first item of the network discovery of your current profile, Enable network discovery must be selected.
- If you need to change anything, remember to save the changes afterwards. Done!
If you have activated all the devices you use according to these instructions, you should now be able to exchange files and use other advantages without any problems within your Windows 10 workgroup. In the Explorer, you can see all linked computers under the Network item. This overview is available for both Windows 10 Home as well as Windows 10 Pro. You have successfully learned how to setup a home network on Windows 10.