On Windows 10, can you actually resize photos with just a few clicks? Technology is advancing all the time. Cameras can capture more and more details, while even cell phones have a few megapixels. A picture taken with a smartphone quickly has a file size of over 5 MB. When you look at your rapidly shrinking storage space after your summer vacation, you’ll rightly wonder how to compress photos in Windows 10.
Microsoft has taken care of this: Basically, you don’t need any additional software. Your Windows 10 installation already offers you several solutions in the on-board tools. Only if you want to resize a large number of photos in just one step, you have to rely on external support. We will show you the best option for compressing pictures without noticeable quality loss.
How to Compress Photos in Windows 10?
- Resize Photos with the App from Microsoft
- Reduce Pixels in Paint 3D
- Compress several Photos using Photoshop
So let’s start with the first option:
1. Resize Photos with the App from Microsoft
The Windows app Microsoft Photos has already been the standard program for viewing pictures for several versions of the popular operating system. Gradually, (partly essential) features were added, including basic options for image editing. For example, here’s how to compress photos in Windows 10 with just a few clicks:
- Open the image you want to edit in the Photos app. To do this, just double-click on the file, if you haven’t changed the default program so far. Otherwise, you can find the application by right-clicking on Open with, NOT by selecting Edit with Photos.
- In the program, simply right-click in the middle of the image and in the menu that opens, click Resize Image.
- Choose the appropriate one from the three predefined sizes S, M and L or set your own dimensions.
- Save the corrections. Be sure to change the name of the new file if you want to keep the original in case you want to resize the photos once again.

How do I Change the Pixel Size of an Image?
Microsoft already tells you for pictures S, M or L what files are best suited for when you have reduced the size of the photos. Our example image by Jörg Vieli (Pixabay) originally had a size of about 2,500 KB. In the L-version it became 1.100 KB, in M about half with 550 KB and S had only 70 KB. This can free up a lot of space when saving, so you might not even need any second hard disk ever. Also, there is no difference between L and M to the human eye on a normal computer screen. This only becomes clear when zooming in after you have resized photos on Windows 10.
2. Reduce Pixels in Paint 3D
Launched in 2017 as a successor to the tried-and-true app, Paint 3D lets you resize photos on Windows 10, among other things. The elements for drawing 3D objects, the current focus of the program, can be safely ignored. So, you want to know how to compress photos in Windows 10? Simply proceed as follows:
- Open the image you want to resize in Paint 3D (right-click and open with). A new project will be created.
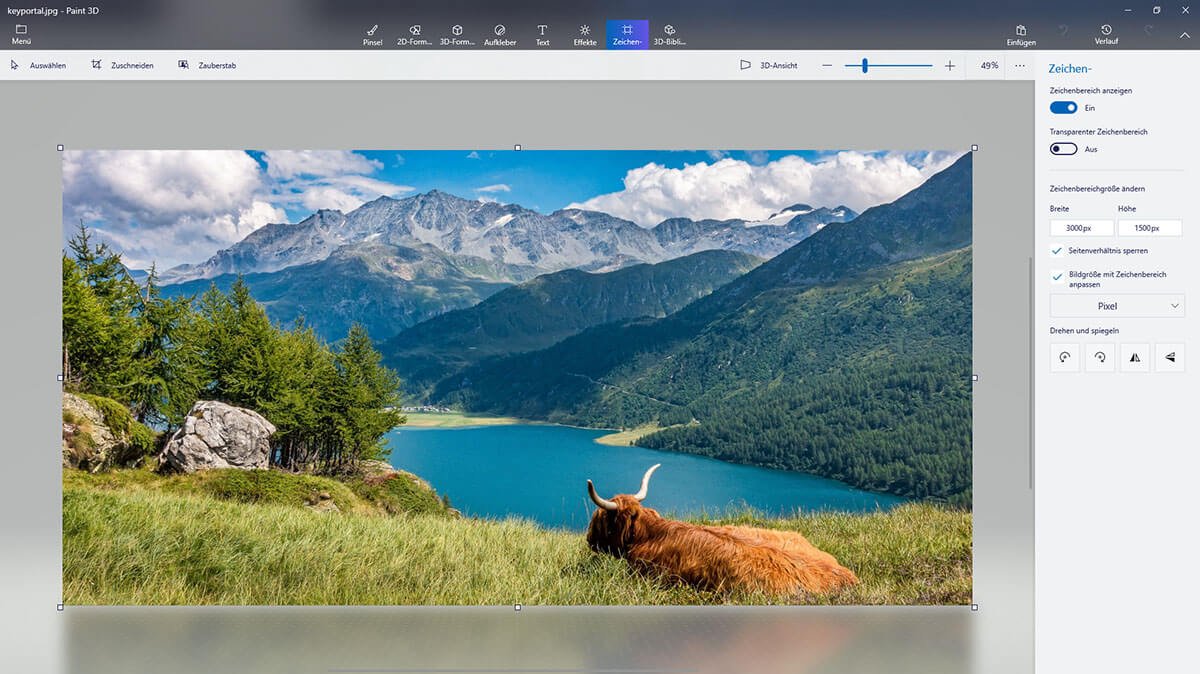
- In the menu bar above, you will find the item Drawing Area in the center. Click on it to refresh the window on the right.
- Under Change drawing area size, you will see the width and height of your image. You can reduce these values to make the photo smaller.
- With Quick Save (Ctrl + S) you overwrite the old file. Save as lets you create a copy with the smaller pixel size.
You want to resize photos in Windows 10, but all the data values don’t mean anything to you? Paint 3D gives you the option to use percentages instead of pixels and keep the aspect ratio at the same time. Reducing the size of an image to 50% has never been easier.
3. Compress multiple Photos using Photoshop
Compared to the methods presented so far, Adobe Photoshop is, of course, a powerhouse that gained notoriety for its numerous features. That’s why the program is not free. However, you can try Photoshop for free or go back to older versions. Of all the features, we’re only interested in how you can resize multiple photos at once:
- Open Adobe Photoshop.
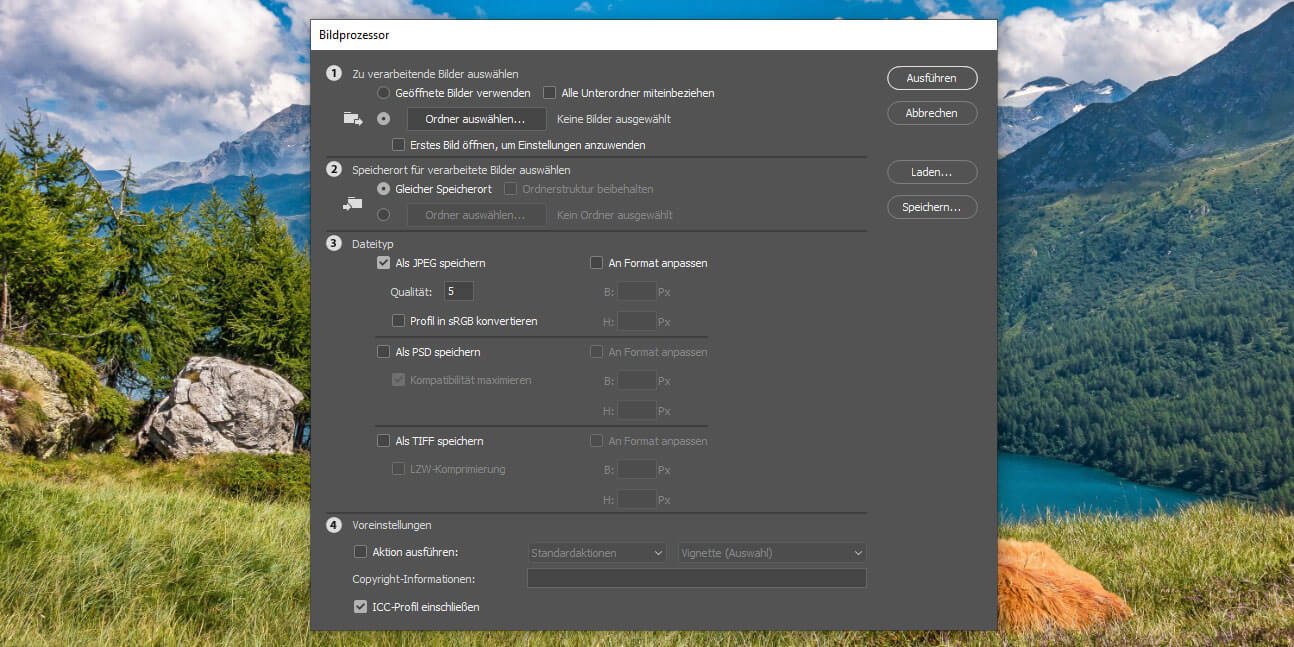
- Go to the File menu and select Image Processor from the Scripts menu. A new window will open.
- The first thing you do is determine which photos you want to resize. The easiest way to do this is to specify their storage location under Select Folder.
- Then you specify the new location. Same location creates a separate subfolder.
- Under File type, the default JPEG is recommended. Photoshop even lets you set the quality on a scale from 1 to 12. The lower this value, the smaller the files will be.
- Set the final preferences and click Run. Done!
In parallel to resizing photos, Photoshop’s script can, for example, watermark each file with your brand – which hopefully is less annoying than the “Activate Windows”. An additional option is extended information about the copyright of professional images.
All these programs, apps and applications run under both Windows 10 Home as well as under Windows 10 Pro. So if you want to resize photos on Windows 10, just follow the steps described above. Because unlike the editing of a PDF, you already have all the necessary software. Soon you will also know how to compress photos in Windows 10 without any more help.