How to install Windows 10 from USB – or would you rather use alternative methods? After Microsoft announced on January 14, 2020 that all devices with the operating system Windows 7 no longer receive security updates, now is a good time to upgrade to Windows 10. Therefore, we will show you step by step how to create a Windows 10 bootable USB. With this stick, you can also back up your operating system on an external drive.
How to Create a Windows 10 Bootable USB?
- Download Windows 10 Media Creation Tool and Run Setup
- Accept License Terms on how to Install Windows 10 from USB
- Decide on your Installation Media
- Determine Language, Architecture and Edition of Windows
- Select Medium to Create a Windows 10 Bootable USB
- Specify the Drive of the Boot Stick
- Download Windows and Complete the Setup
- Connect Medium and Install Windows 10 from USB Stick
This is how to install Windows 10 from USB. In the following, we will get you all the detail with the help of up-to-date screenshots. To create the boot stick, you only need a working PC with an internet connection and a USB with at least 8 GB of free space. Delete all other data on the medium, best of all over the integrated administration tools.
Important: Before you can use Windows 10 with a new installation, you must provide a valid product key. Just have a look around in our store. Windows 10 Home, for example, you can find at a great price without any additional costs – all updates included.

Instructions: Install Windows 10 from USB stick
1. Download Windows 10 Media Creation Tool from Microsoft and Run Setup
How to create a Windows 10 USB stick – that requires advanced knowledge without the support of software developed specifically for this purpose. That’s why Microsoft offers their Media Creation Tool free of charge for all current operating systems as a download. Simply click on “Download tool now” on the page and start the setup by opening the file. With this, you have already completed the most important step to make a USB stick bootable for Windows 10.
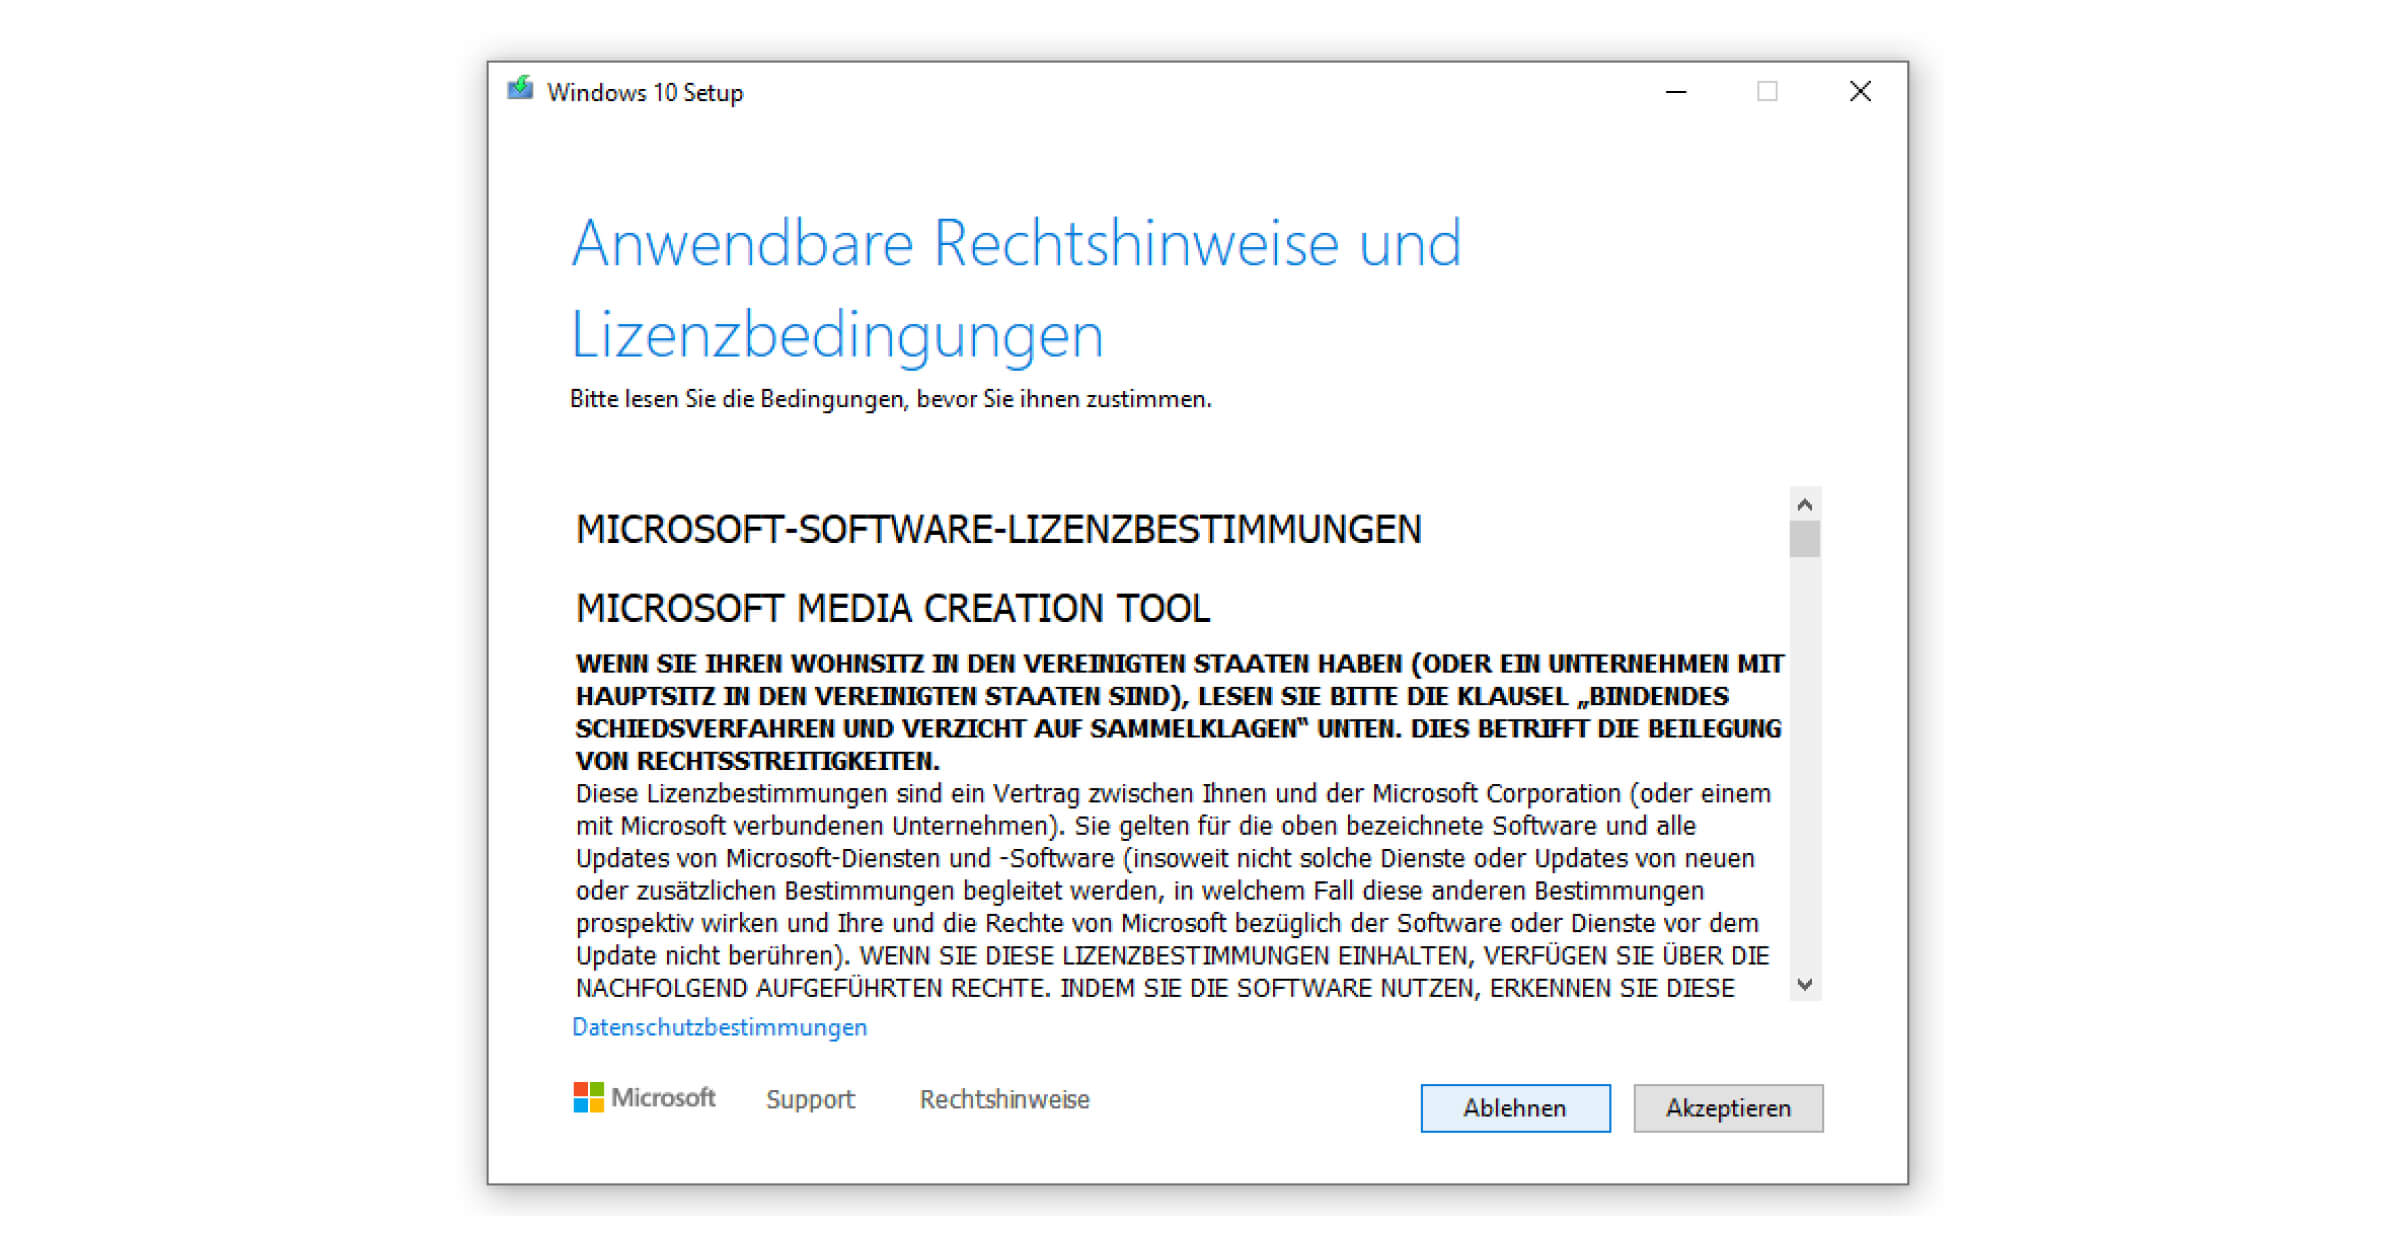
2. Accept License Terms on how to install Windows 10 from USB
First of all, you have to accept Microsoft’s terms and conditions. Only after this acceptance, you can continue with the setup and install Windows 10 from a USB stick. Read these instructions as carefully as you can, but don’t worry about including all the details. Most of it is standard. Save the information in the clipboard if you want to proceed with the installation of Windows immediately.

3. Decide on your Installation Media
At this point, you select the second item “Create installation media for another PC”. This menu is valid for USB sticks as well as for backing up an ISO file on a DVD to install Windows 10 this way.
Tip: For this alternative installation of your operating system, you can check out our guide to burning a Windows DVD. Take a look at it! Otherwise, simply proceed to the next step to create your Windows 10 USB flash drive.
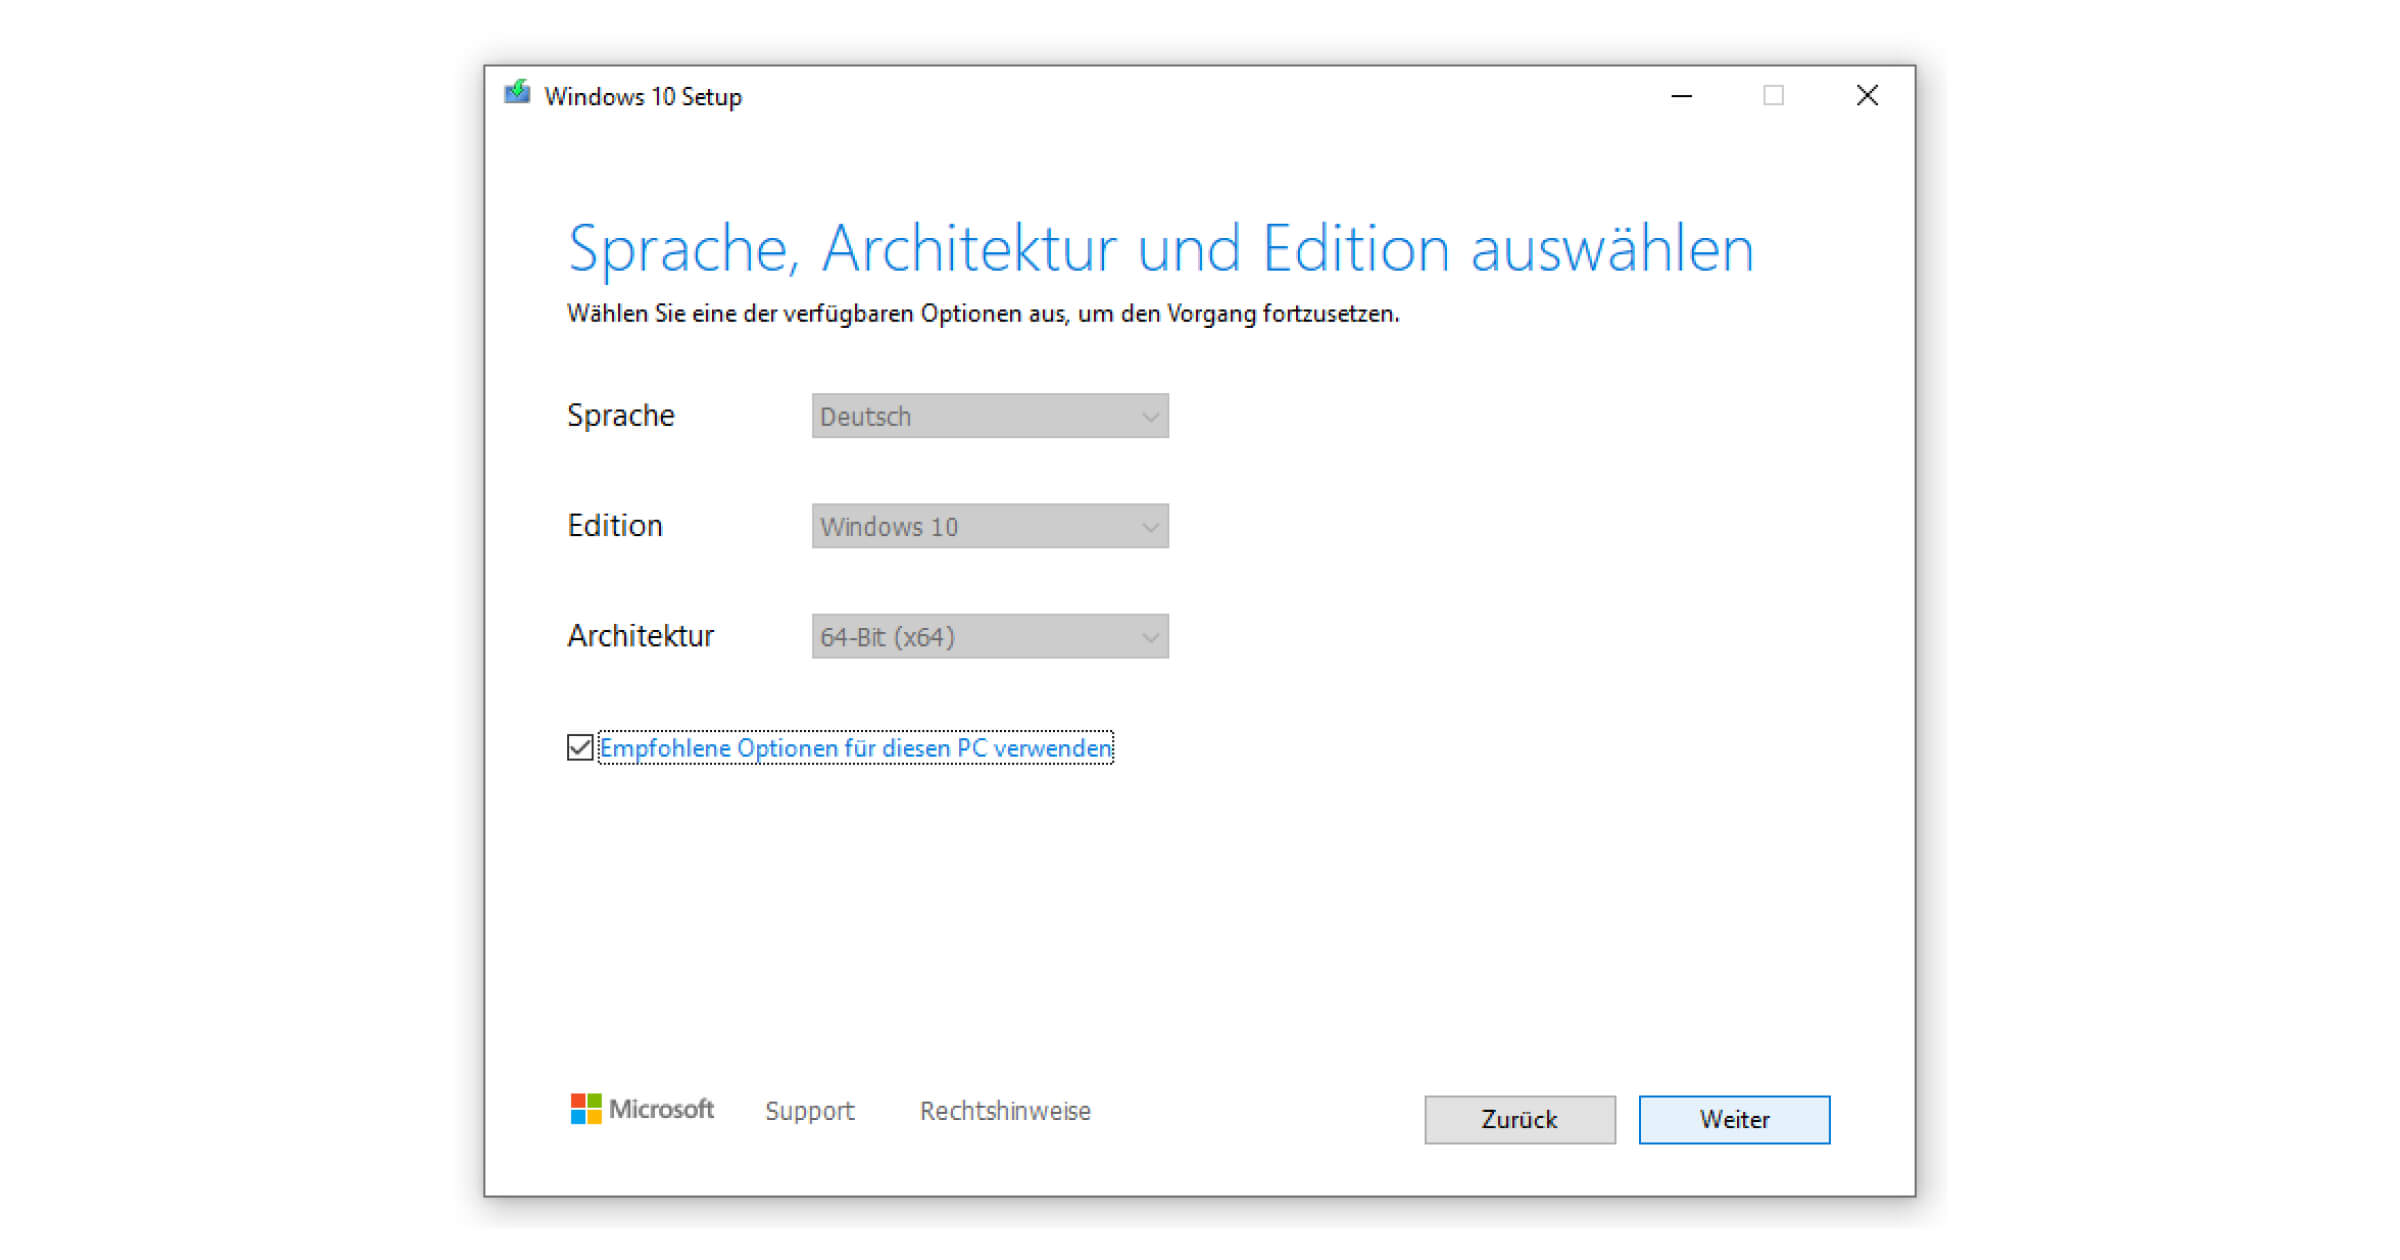
4. Determine Language, Architecture and Edition of Windows
How to install Windows 10 from USB – this is what you have to consider! Because whether later on the correct data is available, depends primarily on the options selected here. Usually, the language should be set to English (UK or US), the edition to Windows 10 and the architecture to 64-bit for newer computers.
For help in choosing the architecture, check out our comparison of 32-bit and 64-bit. For a new installation on the same device, you can also generally rely on the recommended settings. Which version (Windows 10 Home or Pro) of your operating system depends exclusively on your product key.
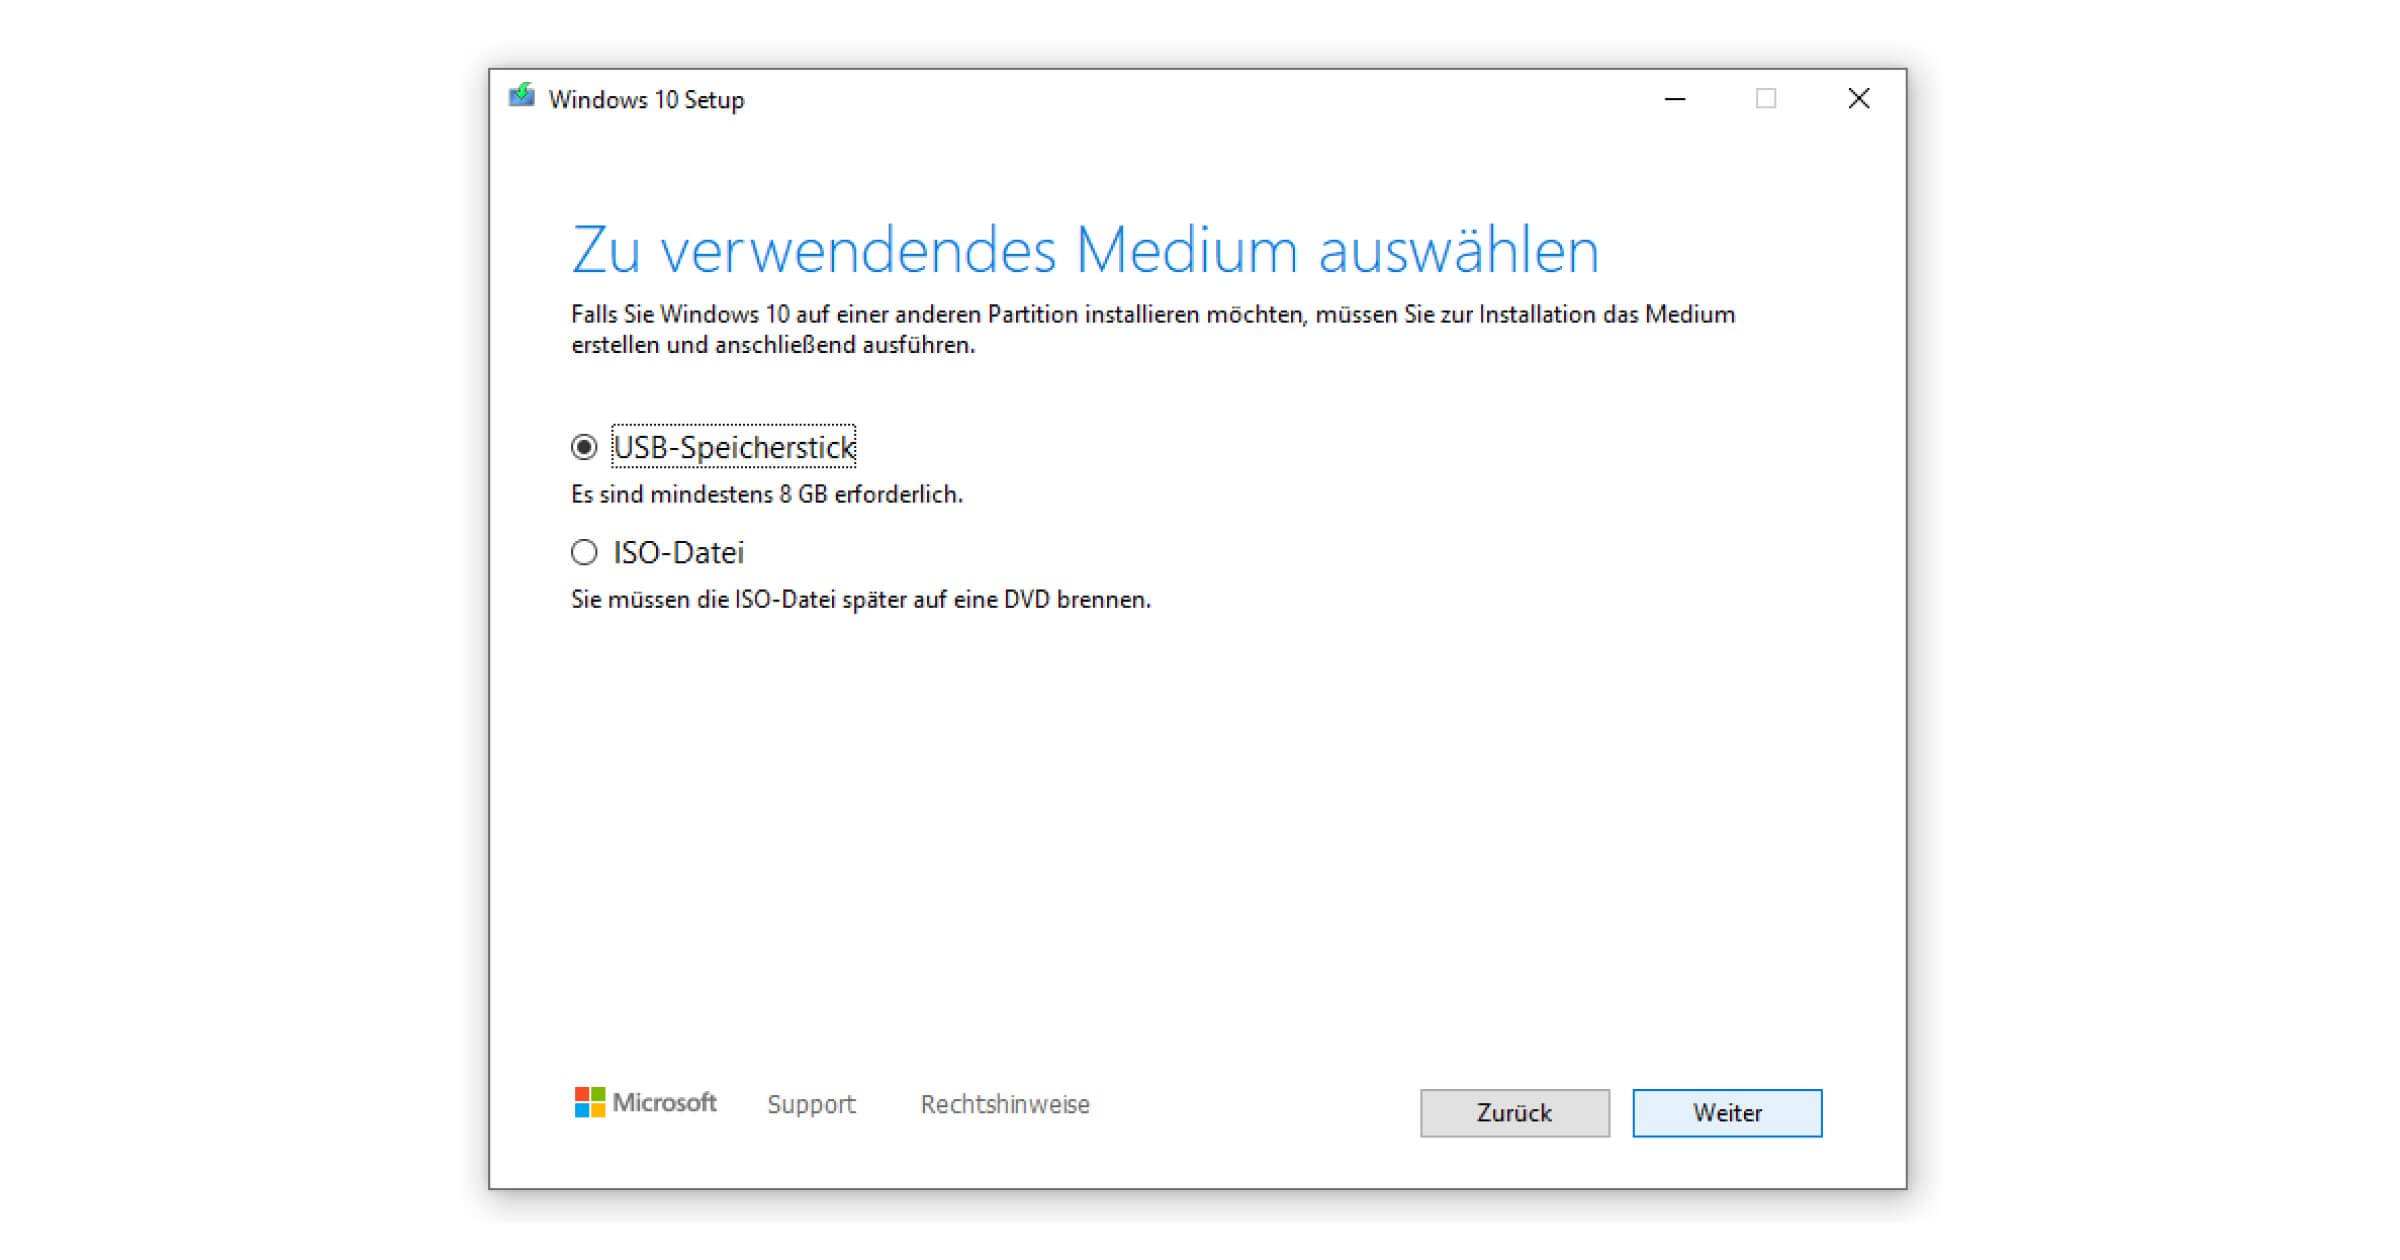
5. Select Medium to Create a Windows 10 Bootable USB
Since most modern laptops no longer have a drive for CDs or DVDs, we generally advise you to use a USB stick as the storage medium. Depending on the options you selected in the previous step, you will be informed about the required storage space. As a rule, you have to calculate with at least 8 GB so that Windows 10 can be installed from the USB stick.
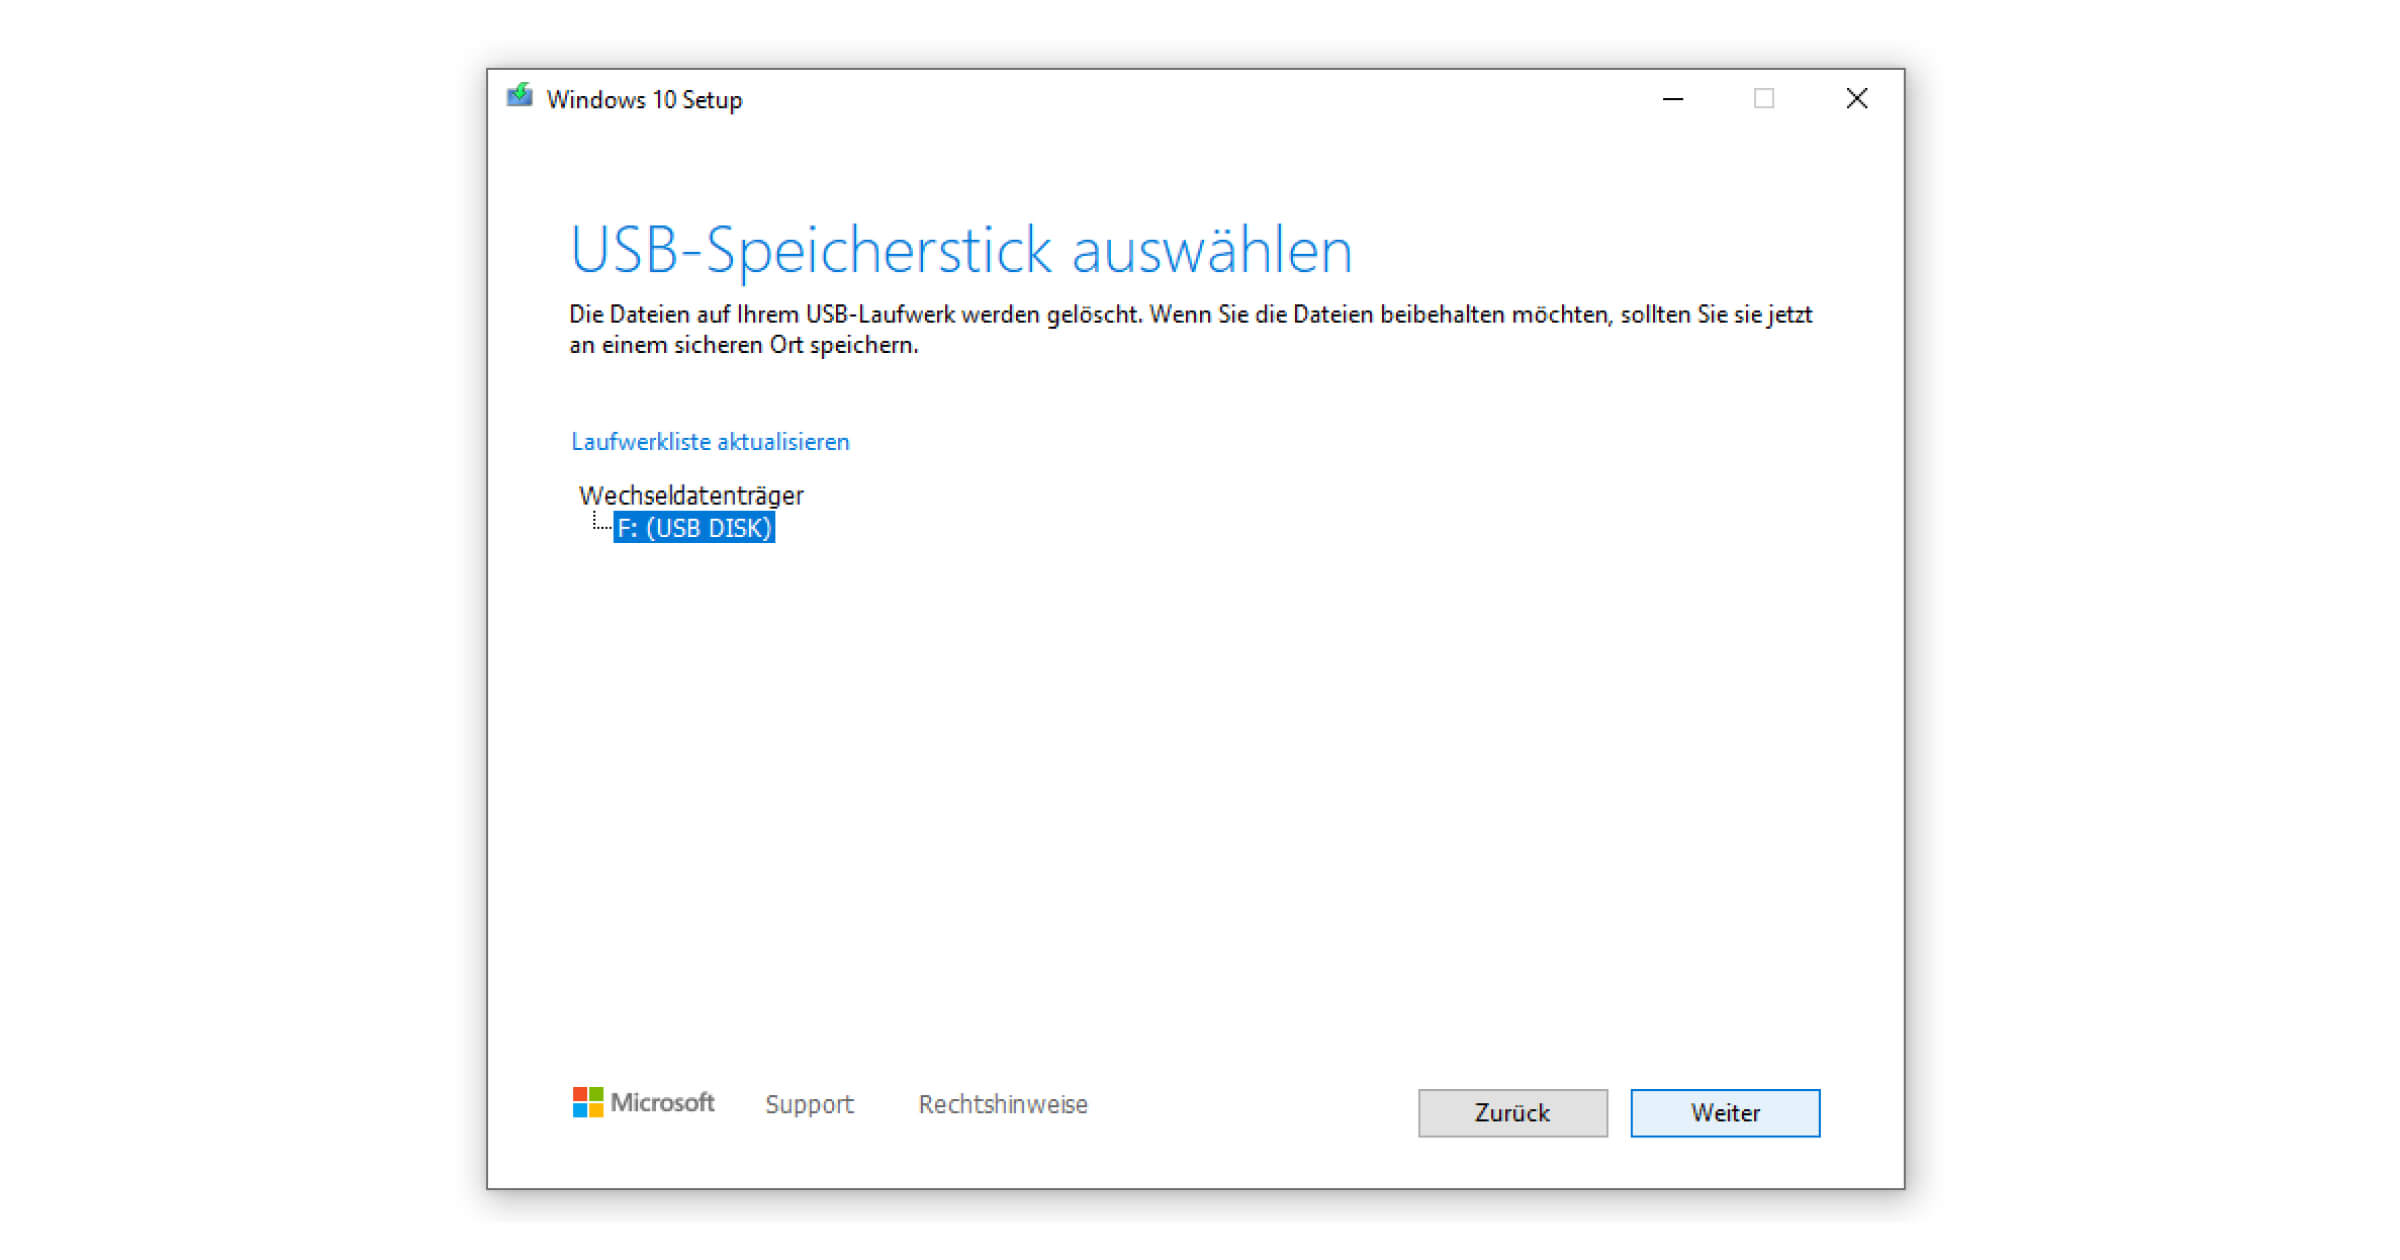
6. Specify the Drive of the Boot Stick
At this point, you should connect the USB stick to the PC. If your removable drive does not show up, you can click Refresh Drive List. In case of problems, you should test your Windows 10 USB stick on another device beforehand.
7. Download Windows and Complete the Setup
Thereupon download Windows 10 and the setup closes after a short cleanup. You can now remove the bootable USB stick.
8. Connect Medium and Install Windows 10 from USB Stick
Now only the actual installation is missing. The completion depends on whether you want to install Windows 10 on another computer or if you just want to re-install the operating system. In any case, shut down the device in question, connect the USB stick and press the reboot button.
The boot setup should open automatically and the Microsoft Installation Wizard will guide you through the remaining steps. Now you can finally install Windows 10 from a USB stick. If the manager does not start by itself, pressing F2 or F8 (depending on the model type also F12, Del or ESC) in the first seconds of the boot process will take you to the BIOS to select the boot order (USB stick as primary drive).
Note: After completing this process, you should directly update Windows 10 to close possible security gaps caused by outdated versions. If you have only recently purchased a current version, such as Windows 10 Pro, only a small amount is required here.
Knowing how to install Windows 10 from USB is all well and good, but are you interested in more advanced topics? In another article, we will explain how you can install a data medium on a format like FAT32, so that you can create a Windows 10 bootable USB.
